















English


Gameplay
How to Play Diablo IV: The Deep Pit




I've spent more hours in the Pit than I care to admit. When it first dropped in Season 4, I treated it like any other dungeon: go in, kill everything, collect loot, leave. That worked fine for about twenty tiers. Then tier 65 happened, and I ate dirt six times before the boss even spawned. That was the moment I realized the Pit plays by different rules.
What I want to walk through here is not the official mechanic description you can read on a tooltip. You probably already know the basics: enter the Pit, kill monsters to fill a progress bar, fight a boss before the timer runs out, get rewards. The real question is how to approach it efficiently, and that is where most players, myself included, took a while to figure things out.
The Tier System Is Not What You Think
Every time I see someone ask "what Pit tier should I be running?" in chat, the replies flood in with numbers pulled from thin air. "Tier 100 minimum" or "just push as high as you can." Both answers are wrong for different reasons.
The Pit scales monster health and damage with each tier. The real inflection points are the Torment difficulty unlocks: clearing tier 20 gets you Torment I, tier 35 for Torment II, tier 50 for Torment III, and tier 65 unlocks Torment IV. Below those thresholds, you are still progressing through world tiers. Above tier 65, every additional tier demands more from your gear, your paragon setup, and honestly, your patience.
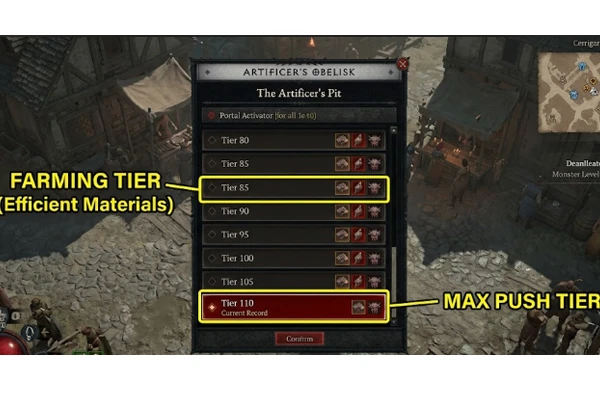
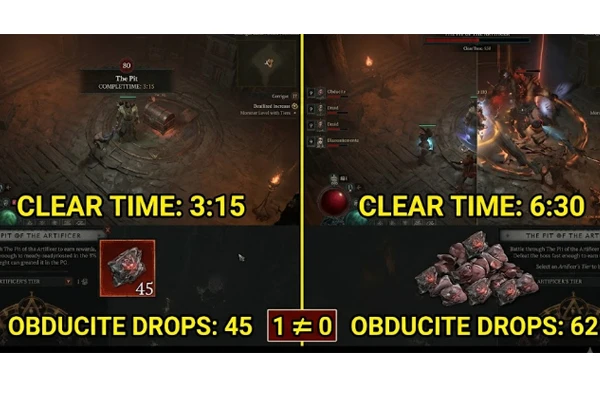
But here is the thing nobody told me: the tier you can complete is not the tier you should be farming. I can clear tier 110 on my sorcerer. It takes me eight minutes and I die once or twice on the boss. That is terrible for farming. I drop down to tier 90, clear it in three minutes without a single death, and I get more Obducite per hour than I ever would pushing my limit.
A good rule of thumb I landed on after testing a lot of runs: your farming tier is whatever you can clear in under four minutes, consistently, without dying. For most decent builds, that is going to be 15 to 20 tiers below your absolute max. The game rewards speed far more than it rewards pushing.
[IMAGE PLACEHOLDER] [Image Suggestion] A screenshot showing the Pit tier selection interface with tiers 80-110 visible, highlighting the difference between farming tier and max push tier. Caption: "Your farming tier and your max tier should be far apart. Speed beats difficulty for material gains."
Progress Bar Strategy Nobody Talks About
The progress bar fills when you kill monsters. That much is obvious. What is less obvious is how the game weights different enemies. Champions and elites give way more progress than trash mobs. Grotesque Debtors, those big exploding guys, are worth a ton of progress. The little fallen shaman in the corner? Barely moves the bar.
I used to clear every pack I saw. Full clear mentality from years of ARPGs. That was actively hurting my clear time. Once I started skipping sparse packs and hunting elite clusters, my average run dropped by almost two minutes.
The other thing: the map layout of the Pit changes, but the logic does not. There are always dead ends and there is always a main path. Learn to read the minimap faster. If you go left and see three empty rooms, double back and go right. The monsters are always clustered along the main route. Wandering off into side rooms that have two skeletons in them is not exploration, it is losing time.
One more thing about the progress bar: the second portal. After you fill the bar, a portal opens to the boss arena. You have a few seconds before it activates. Use that window. Swap to your boss-killing setup if you carry alternate gear. Pop any cooldowns that are about to come back. Check your potion count. Rushing through the portal the instant it appears has gotten me killed more often than the boss mechanics themselves.
The Bosses Are the Real Gatekeepers
Trash clearing in the Pit is rarely the problem. If your build can handle the tier, you will clear the bar with time to spare. The boss is where everything gets decided.
Different bosses show up in the Pit depending on the rotation, and some of them are wildly harder than others at the same tier. The Blood Bishop, for instance, has that homing projectile phase that can one-shot you if your shadow resistance is not capped. The Spiritcaller summons adds that, if you ignore them for five seconds, stack debuffs that make the next hit delete you regardless of your health pool.
I learned this the hard way: for Pit bosses, defensive stats matter more than offensive ones at higher tiers. Everyone gears for damage because damage is fun. I get it. But when the boss auto-attack chunks 70% of your health bar even with capped armor and resistances, the problem is not your damage output. It is what else you have layered on top of those caps.
Here are the things that actually keep you alive against Pit bosses beyond tier 80:
- Armor is capped at 1,000 across all Torment difficulties now. Any armor above 1,000 does nothing. Hit the cap and stop. Do not waste affix slots or tempering rolls on more armor once you are there.
- Elemental resistances cap at 70% by default. Certain class passives and paragon nodes can raise this ceiling, and if your build supports going above 70%, that extra resistance is pure value against bosses with heavy elemental damage.
- Once armor and resistances are capped, the real survival comes from stacking percentage-based damage reduction. Damage reduction from close enemies on chest and pants alone has saved more runs than I can count. Most boss attacks land within melee range even when you play a ranged build.
- Shield generation and barrier uptime matter more than raw life total in the current sandbox. If your class has access to consistent shields, invest in them. A permanent barrier that absorbs 30% of your health is better than having 30% more health with no barrier.
- Movement speed on boots and amulet. This sounds like a farming stat, but repositioning during boss mechanics is what stops you from eating the big telegraphed hits. Dead characters do zero DPS.
I have rebuilt three characters specifically to fix boss survivability after hitting walls in the Pit, and every single time the fix was not more damage. It was plugging a defensive gap I had been ignoring because it did not show up on the training dummy numbers. The Pit bosses do not care about your dummy DPS.
Masterworking Materials and Why You Are Here
Let us be honest about why most of us are running the Pit in the first place: Obducite. This is the only masterworking material in the game now. Ingolith and Neathiron were removed back in Season 6, and honestly, the system is cleaner for it. One material, all twelve masterworking ranks, no conversion hassle at the Alchemist.
How it works now: Obducite drops from every Pit tier. The higher the tier you clear, the more Obducite you get per run. That is the entire system. No tier brackets to worry about, no material that suddenly stops dropping when you push past a certain threshold. Just more Obducite for harder content.
Something I wish I had internalized earlier: the Obducite increase from tier to tier is not linear but it plateaus. Going from tier 60 to tier 80 gives a noticeable bump in Obducite per run. Going from tier 100 to tier 120 is a much smaller gain. And if those higher tiers take you twice as long, you are getting less Obducite per hour, not more. Do the math on your own runs. Time yourself. Count the materials. The sweet spot is usually somewhere in the tier 80 to 95 range for most builds at the current power level, because that is where clear speed and material yield intersect.
When to Push vs. When to Farm
There are exactly two reasons to push your highest possible Pit tier. First, you want to unlock a higher Torment difficulty, which means clearing tier 20 for Torment I, tier 35 for Torment II, tier 50 for Torment III, and tier 65 for Torment IV. Second, you want bragging rights. That is it. If neither of those applies, you should be farming, not pushing.
I see players banging their heads against tier 130 for an entire play session, getting frustrated, burning potions and incense, and walking away with fewer materials than if they had done ten smooth tier 90 runs in the same amount of time. I did this myself for about two weeks in Season 5 before I realized what a waste it was.
The push tier is for testing your build. It tells you where the weak points are. Maybe your damage falls off a cliff at tier 115 because you have been neglecting vulnerable damage multipliers. Maybe your survivability craters at tier 100 because you skipped damage reduction rolls for more crit chance. Use the push runs as diagnostics, then go back to your farming tier and actually accumulate the Obducite you need to fix those problems.
The Pit with a group changes this math a bit. A well-built party of four that covers each other's weaknesses can push significantly higher than any solo player at the same gear level. A dedicated support barbarian or a crowd-control sorcerer can trivialize boss mechanics that would one-shot a solo DPS build. If you have a group, push together and enjoy the higher Obducite yields. If you are solo, which most of us are most of the time, efficiency farming is the play.
One Last Thing About the Timer
The timer in the Pit creates a psychological pressure that makes people play worse. I have watched myself do it. You see the clock ticking down, you start rushing, you pull three elite packs at once, you die, you lose more time running back, and now you are tilted and the run is probably over.
Each death in the Pit deducts a fixed amount from your remaining time. The penalty escalates: the first death costs you 30 seconds, the second takes 60, the third takes 90. At higher tiers, three or four deaths and you are effectively timed out. So playing fast but reckless is actually slower than playing at a controlled pace and not dying. The time you lose to the death penalty almost always exceeds whatever you saved by yanking four packs at once.
I started treating the timer as a loose suggestion rather than a countdown to panic about, and my clear consistency improved immediately. You need to move with purpose, yes. You cannot stand around checking your inventory. But pulling two elite packs instead of four and surviving is always faster than pulling four and dying. Always.
The Pit is ultimately a test of how well you know your build. Not how well you copied it from a guide. The tier 100 player who understands why their aspects are in those specific slots will clear faster than the tier 100 player who followed a maxroll guide and does not know which button to press when the boss telegraphs a wipe mechanic. Spend time in the Pit paying attention to what kills you and what your build struggles against. The Obducite will come. The game sense will come faster if you stop trying to outrun the timer and start trying to understand the dungeon.


