












English


Gameplay
ZZZ Drive Disc Stats: How to Choose Them?




The most annoying part of drive disc farming isn't the grind itself. It's finally getting a pile of gold discs and realizing only a handful are actually usable. Two identical slot-5 discs — one with elemental damage as the main stat and the other with ATK%, one with double crit substats and the other with two defense rolls — end up miles apart on your final stat sheet. Plenty of players max out their discs' levels, only to have every substat land somewhere useless, then wonder why their Shiyu Defense damage is way lower than the panel suggests. Drive disc stats come down to one core idea: figure out what you're stacking before you worry about how to stack it. Get the direction wrong and no amount of substats will save you. This is me sorting through the holes I fell into, especially the spots where new players get things mixed up.
Main stats and substats are two completely different ledgers
A lot of people jump straight to "how do I roll substats," but what you should settle first is the main stat. Main stats and substats aren't even in the same weight class, and getting the order wrong means burning battery on discs that were doomed from the start.
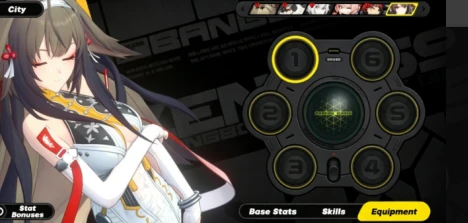
- Slots 1 through 3 have fixed main stats — HP, ATK, DEF, identical for everyone. On those three slots, the only thing worth looking at is the substat. Slots 4, 5, and 6 are where the main stat becomes optional: slot 4 carries crit rate, crit damage, ATK%, or Anomaly Proficiency; slot 5 carries elemental damage, PEN, or ATK%; slot 6 carries Impact, energy regen, or Anomaly Mastery. So what actually decides whether a character comes together is getting slots 4, 5, and 6 right first.
- The base value of a main stat is far higher than a substat. One ATK% main stat is worth roughly ten ATK% substats. So when the main stat is wrong, substats can't make up the difference. Whether slot 4 wants crit rate or Anomaly Proficiency, whether slot 6 wants Impact or Anomaly Mastery — lock those down before touching substats.
Nail the main stats on slots 4, 5, and 6 first, then worry about substats. That's the one step in this whole system you can't skip. Reverse the order and you'll realize you've been grinding for a pile of junk discs the whole time.
Different roles want stats in totally different directions
There's no universal answer for drive disc stats. Attack, Anomaly, Stun, and Support — these four roles follow logic that's almost opposite from each other. This is where people trip up, dragging an Attack character's mindset over to an Anomaly character and digging themselves deeper the more they invest.
- Attack characters stack double crit. Crit rate and crit damage are the lifeblood of direct damage, followed by ATK% and PEN. Double crit substats are the first thing you judge a disc by. Around 70% crit rate is enough once team buffs kick in — the rest of your rolls should go toward crit damage and ATK, which beats mindlessly capping your crit.
- Anomaly characters should avoid double crit like the plague. Anomaly damage doesn't crit, so stacking crit rate and crit damage on an Anomaly unit is money spent on the wrong end of the blade. Their main stats are locked in: slot 4 must be Anomaly Proficiency, slot 6 must be Anomaly Mastery — Proficiency controls the anomaly's damage multiplier, Mastery controls how fast the anomaly builds up. For substats, prioritize Anomaly Proficiency and ATK%, and leave both crit stats alone entirely.
- Stun characters live off slot 6 Impact. Impact determines how efficiently you break the enemy, so a Stun unit's slot-6 main stat is basically locked to Impact, with crit as a bonus on substats. Support characters go the other way entirely — don't stack damage stats on them. Lean into energy regen and buff-type functional stats, and stacking HP isn't always right either.
Memorize those four directions and your stats won't drift. At the end of the day, stats serve the role. Know what your character actually does first, and only then do the stats have a right or wrong answer.
A few traps every new player walks into
Once the direction is clear, the details are what separate the good builds. Every one of these traps has caught almost every new player at least once.
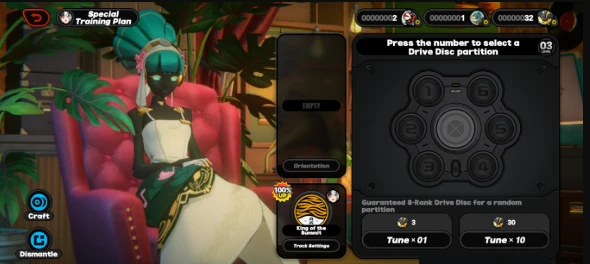
- Force-fitting a set bonus. The 4-piece set effect is strong, sure, but if a mix of off-set pieces has notably better substats, the set's flat numbers can't make up the gap. Early on, substats win over set bonuses — don't wear a full set of garbage rolls just to light up the effect.
- Same-set effects don't stack. If multiple people on the team run the same set, the effect only applies once. Duplicating it is wasted. Keep an eye on team composition so you don't collide.
- Ignoring a set's trigger condition. Some set effects have prerequisites — hitting a weak point, entering combat, staying off-field. If you can't trigger it, you're wearing a blank. Read the trigger condition before you commit to a set.
- Hoping substats can rescue a wrong main stat. As covered, main stat base values far outstrip substats. A disc with the wrong main stat is basically dead on arrival — rerolling is less pain than trying to salvage it.
These traps all boil down to the same thing: trying to save effort, only to spend more. The drive disc system isn't complicated, but every step demands care. Main stats and set trigger conditions are the two places people flip over most often.
At the end of the day, drive disc stats aren't decided by luck — they're decided by judgment. Before you farm, know your character's role. While you farm, lock the main stat first, then look at substats. When you're assembling a set, check the trigger conditions and watch for duplicates. Get those steps in order and every bit of battery and material you spend is a real investment, and your stat sheet climbs in a way you can feel. Flip it around — dive in before the direction is set and the more you farm, the more you lose. Drive discs are the most patience-demanding grind in ZZZ, but once you actually understand how the stats work, the payoff is the most direct in the game.


